The floor press is a highly effective upper body exercise that focuses on building strength in the chest, shoulders, and triceps. Unlike the traditional bench press, the floor press limits the range of motion, making it a great option for athletes looking to reduce shoulder strain while still targeting their chest. Whether you’re recovering from injury or simply want to incorporate variety into your chest routine, the floor press is a powerful addition.
Why Choose the Floor Press?
The floor press is especially beneficial for lifters who want to emphasize their triceps and chest while minimizing stress on the shoulders. The limited range of motion prevents overextension of the shoulder joint, making it ideal for those with shoulder concerns. It’s also a great exercise for improving your lockout strength (the final portion of a lift), which is crucial for heavier bench presses.
Muscles Worked
The floor press primarily works the following muscle groups:
- Pectorals (Chest): The main target, engaged during the press.
- Triceps: Responsible for elbow extension and critical for the lockout.
- Anterior Deltoids (Front Shoulders): Support the pressing motion.
- Core: Helps stabilize your body throughout the lift.
Benefits of the Floor Press
- Reduced Shoulder Strain: Since your elbows stop at the floor, the range of motion is shorter, which helps reduce stress on the shoulder joint.
- Improved Lockout Strength: The focus on the top half of the pressing motion builds stronger triceps, enhancing your ability to lock out heavy weights during the bench press.
- Increased Chest Activation: While the range of motion is reduced, the constant tension on your chest and triceps helps increase muscle activation.
- Core Stability: Lifting without the support of a bench forces you to engage your core, improving your overall stability and strength.
Step-by-Step Guide to Performing the Floor Press
1. Setup the Equipment
You’ll need a barbell or a pair of dumbbells for this exercise, along with sufficient floor space.
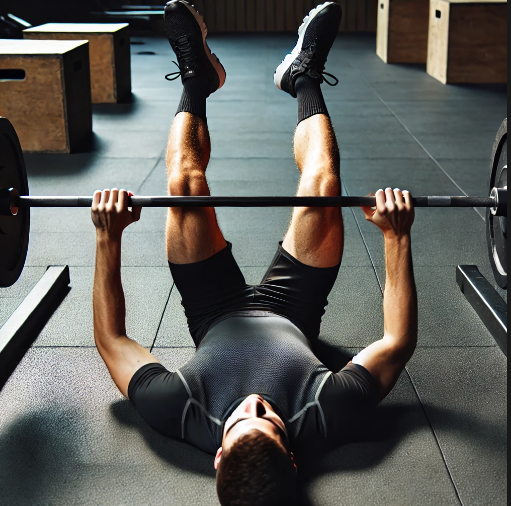
- Lie on the floor with your legs bent and feet flat on the ground.
- Position the barbell or dumbbells over your chest, similar to a bench press setup.
- If you’re using a barbell, set up in a power rack or use a spotter to help lift the bar into position.
2. Starting Position
- Grab the barbell or dumbbells with a shoulder-width grip. For a barbell, an overhand grip (palms facing away) works best.
- Keep your upper arms on the ground and elbows bent at a 90-degree angle.
- Tighten your core and keep your back flat against the floor.
3. Pressing the Weight
- Begin the movement by pressing the weight straight up until your arms are fully extended.
- Avoid flaring your elbows outward. Instead, keep them tucked at a 45-degree angle to maximize chest and triceps activation.
- Squeeze your chest and triceps at the top of the movement.
- Pause briefly at the top to control the weight.
4. Lowering the Weight
- Slowly lower the bar or dumbbells back down until your upper arms touch the floor. This is the point where the floor press differs from the bench press, as the floor limits your range of motion.
- Let your elbows briefly rest on the floor, but avoid bouncing or slamming them down.
- Maintain control throughout the descent, focusing on engaging your chest and triceps.
5. Repeat for Desired Reps
- Perform the desired number of reps, typically in the 8-12 range for hypertrophy (muscle growth), or 4-6 reps if you’re focusing on strength.
Common Mistakes to Avoid
- Arching Your Back: Unlike the bench press, it’s important to keep your back flat on the floor throughout the lift. Arching can reduce stability and increase the risk of injury.
- Bouncing Elbows Off the Floor: Some lifters may let their elbows slam into the ground to gain momentum for the next rep. This not only reduces the effectiveness of the exercise but also risks elbow injury.
- Using Excessive Weight: If the weight is too heavy, form can suffer. Stick to a manageable weight that allows you to control both the upward and downward phases of the movement.
- Elbow Flare: Keeping your elbows tucked at a 45-degree angle helps protect your shoulders and maximizes triceps engagement. Flaring your elbows out puts undue stress on the joints.
Variations of the Floor Press
- Dumbbell Floor Press: Using dumbbells instead of a barbell allows for a greater range of motion, targeting the chest muscles even more effectively. It also forces each arm to work independently, helping correct any muscle imbalances.
- Single-Arm Floor Press: A unilateral version of the exercise where you press one dumbbell at a time. This variation improves core stability and balance.
- Paused Floor Press: Pause for a couple of seconds at the bottom of the movement to eliminate any bouncing momentum and increase time under tension for the chest and triceps.
How to Incorporate the Floor Press into Your Routine
The floor press can be used in strength training, hypertrophy workouts, or as an accessory lift to improve your traditional bench press. Here’s how to include it in your routine:
- Strength Training: Perform 3-5 sets of 4-6 reps with heavier weight to build pressing power and triceps strength.
- Muscle Growth: For hypertrophy, perform 3-4 sets of 8-12 reps, focusing on controlled movement and muscle activation.
- Accessory Lift: Add the floor press as a complementary movement to your bench press or upper body workout, especially on days when you want to give your shoulders a break.
Final Thoughts
The floor press is a fantastic exercise for building upper body strength, especially in the chest and triceps. It allows for heavy lifting with less risk of shoulder injury, making it ideal for lifters of all levels. Whether you’re looking to improve your bench press or simply want to add more variety to your workout, the floor press is a great option to include in your routine. Always focus on proper form, controlled movements, and gradual progression to maximize your results